How to paint perfect stripes
Striped walls are all the rage right now, and they can add loads of personality to your home when used as an accent wall, in a bathroom, or in a corner of your house that you want to set apart from the rest. It’s actually easy to get crisp clean lines when painting stripes if you follow a few simple guidelines.

1) If you are painting only one wall, tape the corners. I was very skeptical of this next step, but wanted to try it. (Come to find out, it’s crucial! It’s the key to this whole thing!) After taping, paint over the edge of your tape with your BASE color (the color that’s underneath the tape). Do two coats, just to make sure it’s good and sealed. My side walls were staying green so I painted my two coats of green over the inside edge of the tape.

This step accomplishes two things. If there is any “leakage” under the tape, all that is leaking under is the color that’s already there. Secondly, the paint makes a kind of seal along the edge of the tape, so that any other colors painted on top of that base color are locked out and away from the tape edge. Hopefully that makes sense.
2) I had already decided that I wanted seven wide stripes and wanted the top and bottom stripe to be black. I measured the wall from the bottom of the crown molding to the top of the baseboard. It was 102″, so I just divided by 7 and got 14 1/2″ per stripe. I marked off the rough measurements where I wanted each line on each end of the wall, and then painted the white stripes. The edges didn’t have to be perfect on these, this was just my base and would get clean edges when layering on the black paint.

3) Per the instructions on the painter’s tape, I waited 24 hours to let the white stripes dry. I knew I’d be taping on top of them and didn’t want any of the white paint peeling off when the tape was removed. When dry I re-marked my measurements where I wanted the stripes.
4) Next, I used a secret weapon borrowed from my dad…a chalk line.

If you’ve never used one, they are a great tool to use for marking a straight line over a large space. It’s like a little tape measure, just with string and chalk inside instead of a measure. The inside re-chalks the string when the line is wound back into the housing. To use it, someone holds the end of the string and someone else stretches it across the wall, pulling it as taut as possible.
I was home alone when I was ready to mark the lines and couldn’t reach my trusty neighbor to come over and lend a hand, so I used a piece of tape for one end and stretched the line out myself.

Making sure to line up each end with your pencil marks, you “snap” the line against the wall and it leaves a perfectly marked line all the way across. Popping that string was the most fun part of this whole job!

You could also use a laser level or a good old measuring tape to mark your lines off if you don’t have any of these tools.
5) With the lines marked, I then taped all of the stripes right along the edges of my chalk lines. I also taped the side trim to the doorway that is on this wall.

6) Now, time to seal some more edges. Before going any further, I sealed the tape down the edge of the door trim with white paint, 2 coats, so none of the black paint would leak onto the trim. I also did two coats of white along the outside edges of all of the white stripes (where the black stripe would be touching the white), and two coats along the baseboard which was also taped off.

7) Time for your second color! After my tape sealing coats were dry, I cut in with black along the top crown, ends of the black stripes, and baseboard, followed by rolling a coat on the remaining sections. The black stripes took two coats.

8) Tip time: Whenever I’m painting, this is always how my supplies look:

I line my paint tray with a plastic bag before pouring in the paint. Then, if I’m not using it I slide it inside another plastic bag just to keep it from drying out until I come back to it. When not in use in between coats, I put my trim brush in a ziploc bag, cover my trim cup with a baggie, and wrap a plastic bag around my roller. You basically just want to block any air from getting to the paint so everything won’t dry out. I’ve left these for several days before and they’re always ready to go when I come back to them. It’s really nice not to have to rinse everything out until you’re finished. When you’re finished with the paint tray, pour the leftover paint back in the can and toss the bag. No clean-up!
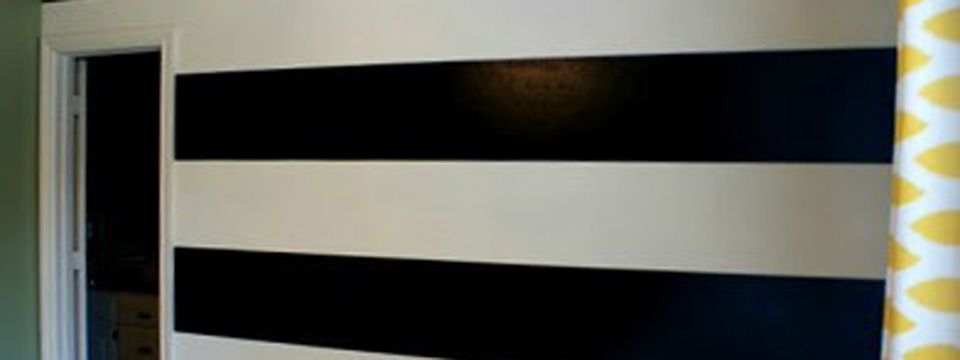
9) After the final coat, I peeled all of the tape off immediately. I paused for a minute before doing it, really expecting to see scraggly lines under the tape. Much to my delight, the lines were PERFECT, even on my textured walls. So much better than I ever hoped for. The lines look totally professional and clean.


This wall can remind everybody who comes into my house of the best kind of stripes:
“But He was wounded for our transgressions,
He was bruised for our iniquities;
The chastisement for our peace was upon Him,
And by His stripes we are healed.” Isaiah 53:5